Warning: Trying to access array offset on value of type null in /home/devonkarn/rootsnveggies.com/wp-content/themes/herothemetrust/functions.php on line 819
Sprouts: Little green things

Right around St. Patrick’s Day, when it’s too early to plant seedlings and the thought of eating another root vegetable sends me looking for a reason to hunger strike, I crave fresh, green things like a jailbird craves freedom. I know scientists say that the body doesn’t really yearn for the nutrients it needs – that it’s all in our heads – but quite frankly I think those guys haven’t taken their lab-coat-covered asses out into the back country. Ever. I’m convinced there are reasons you stumble, stinky and full of re-hydrated brown meal packets, out of no-man’s land ready to stab someone for a salad.
Enter: sprouts. They might hold the enviable position of being the one of the only things anyone can grow anywhere – garden, green thumb, or neither. If you have a window, access to fresh water, and room for a mason jar, you can grow sprouts. (Coincidentally, I’ve heard you can grow them on backpacking trips using a ziplock with a damp paper towel and seeds placed on top of your pack as you hike, but I haven’t tried it.)

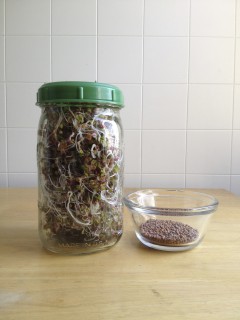
A tiny pile of seeds yields a whole jar of sprouts.
Growing sprouts is stupid-easy. Here’s what you need:
• Sprout seeds
There are so many options – radish, mung, broccoli, clover, alfalfa, a mix, and more. You can buy seeds specifically tailored for sprouting from most seed catalogs (I love some of the blends available at High Mowing Seeds – organic, sold in good-sized packets with a ziplock top, and they come with clear instructions) and at more progressive garden centers.
• A clean, quart-sized canning jar
• A top for the jar that would allow you to drain water from it. This could be as simple as a piece of cheesecloth and a strong rubber band or a perforated, screw-on lid specifically engineered for growing sprouts in a jar. There are two basic kinds: one is pretty much a metal screen that fits inside a canning jar band, and kind of sucks because it rusts. The other is a green plastic lid with lots of holes built in, and that’s the way you want to go (see the photo). You can buy them where you find sprouting seeds.
Then here’s what you do.
1. Fill your jar with 2 tablespoons of seeds. Add about two cups of luke-warm water, screw on your lid, and let them soak for about 8 hours for most seeds. Smaller seeds, like radishes, sit for only two hours; check your instructions.
2. After they’re done soaking, drain out the water, rinse well, and tip the jar upside down in a bowl at an angle so water can continue to drain (you don’t want them sitting in water, because they’ll get smushy and mold). Cover the jar with a towel to keep them shaded.
3. Rinse and drain in the same way in the morning and evening for about five days. By that point, the seeds will have grown little white shoots and a pair of tiny leaves.
4. Put the jar in a sunny spot to let the sprouts green up for a day. Then store them in the fridge for about a week. Easy, right?
These fresh little wooblies ward off scurvy and come to the rescue when it comes to freshening up winter’s carby things. They are fantastic on sandwiches (I love the crunchy ones on a turkey and hummus pita), elevate a beet and feta dish, and make a vinegar-dijon potato salad feel a little more like spring. And come summer, when you have friends who looove to brag about all the crap they grow, you can show up to a potluck rocking a dish featuring sprouts you grew yourself.
